Showing posts with label Recipes. Show all posts

Friday, October 24, 2014

The smells of autumn: Maple sweet potato cupcakes with whipped cream cheese frosting

Pumpkin is everywhere right now. I've seen pumpkin toaster pastries, pumpkin coffee drinks, pumpkin cakes and cookies and crisps... now don't get me wrong, I'm a big fan of pumpkin, but these are a nice change of pace. Sweet potato and spices give these a perfectly autumn taste and the dollops of so-light-you-can't-believe-it frosting sit on top like little clouds. I made these for Halloween topped with candy corn, but they'd be equally well-suited for Thanksgiving or Christmas, too.


Maple sweet potato cupcakes with whipped cream cheese icing (makes 2 dozen)

  • 2 cups of cooked sweet potato, mashed smooth
  • 1 cup vegetable oil (you can substitute applesauce to make these lower fat)
  • 1 1/2 cups brown sugar
  • 1/2 cup maple syrup
  • 3 eggs
  • 1 teaspoon vanilla extract
  • 1 cup whole wheat flour
  • 1 1/2 cups all-purpose flour
  • 3 teaspoons ground cinnamon
  • 1 teaspoon ground ginger
  • 1/2 teaspoon nutmeg
  • 1/2 teaspoon allspice
  • 1 teaspoon baking powder
  • 1 teaspoon baking soda
  • 1/2 teaspoon salt
Preheat oven to 325 degrees and grease muffin pans or use liners.

Blend together sweet potato, oil, sugar, syrup, eggs and vanilla in a large bowl. If the sweet potato doesn't seem quite smooth, use an immersion blender for this step.

Sift together flours, spices, leaveners and salt and fold into the wet ingredients.

This recipe rises high, so fill cups half full. Bake for 20 minutes or until cake springs back when pressed.

Whipped cream cheese frosting (makes enough for 1.5 to 2 dozen cupcakes, depending on  how much you use)
Note: Instead of vanilla, you can use cinnamon, caramel, or any other flavoring that sounds good to you.
  • 8 ounces cream cheese
  • 1 cup heavy whipping cream
  • 1 cup confectioner's sugar
  • 1/4 teaspoon salt
  • 1 teaspoon vanilla extract
In a chilled bowl, whip cream until soft peaks form. Add in sifted sugar and  continue beating until peaks hold. Put the whipped cream into the refrigerator to keep it chilled.

In another bowl, beat the cream cheese, salt and vanilla until soft and fluffy. Very gently fold in the whipped cream and then blend together with the mixer until completely blended. Pipe onto cupcakes as desired.

Sunday, October 12, 2014

Fluffy Sunday Morning Scones

The past year has taught me -- again and again and again but let's not ruminate, yes? -- that food is about more than nourishment. Food can be a ritual, a tradition, a comfort. And for me, one of the most cherished routines has often been Sunday morning breakfasts. 

Saturday mornings in our household are for rushing headlong into the weekend... tackling all the tasks that have built up over the week, and jumping straight into special kind of chaos that only having two littles around the house can bring.

But Sundays... Sundays are different. After a whole day of rushing here and there with two children in tow, Sundays are more about slowing down a little bit and getting ready for the coming week. Sunday mornings are about enjoying your cup of coffee instead of gulping it down, and maybe getting a little indulgent with breakfast with things that could stand in for dessert.

Enter... scones. Sweet but not cloyingly so, rich, crumbly and practically melting on your tongue, scones are easy to whip up first thing in the morning but are just as good made the night before so you can hopefully eke out a few more minutes of sleep. 

This recipe is endlessly customizable with whatever flavors strike your fancy. I've made them with vanilla and chocolate chips, almond flour and almond extract topped with sliced almonds, and sweet cinnamon. But how about dried blueberries with some lemon zest and juice in the dough? Or bits of chopped apple and some caramel extract? Or perhaps a drizzle of simple glaze to take it over the top?


Fluffy Sunday Morning Scones
  • ½ cup butter
  • 2 cups flour - I usually use a blend of whole wheat and all-purpose
  • ½ cup sugar with a little extra for dusting
  • 1 teaspoon baking powder
  • ¼ teaspoon baking soda
  • ½ teaspoon salt
  • 1 large egg
  • ½ cup yogurt (preferably full-fat)
  • 1 teaspoon vanilla extract
  • ½ cup chocolate chips

Preheat your oven to 400 degrees and line a baking pan with parchment paper.


In a medium bowl, use your hands, a pastry cutter or a food processor to blend the butter in with your flour, sugar, leaveners, and salt until it looks like coarse crumbs.


In a separate bowl, blend together the egg, yogurt and vanilla. Add to butter + flour mixture and gently press until dough holds together; add a bit of milk if needed to help it hold together. Add in chocolate chips if using them, or any other stir-ins. Scoop the dough onto your pan, sprinkle with sugar to prevent it from sticking to your hands, and gently pat it into a disc. Don't worry about making it perfect, as a bit of imperfection will make for a wonderful rustic texture! Cut into 8 wedges; pull them apart a bit and bake for approximately 15 minutes.

Sunday, August 10, 2014

Chocolate cupcakes with fluffy marshmallow frosting

As much as we'd all like to deny it as we savor our kale salads and homemade yogurt, there's a part of our brains that occasionally lingers on those oh-so-unspeakable treats from our childhoods. You know, the kind that came in boxes on grocery store endcaps, with a shelf life of at least 2 years.

But you can't actually go back there. It's like going back to a childhood home... it's never quite the same way you remembered it.


So you recreate what you remember, but you make it better. No shortening. No chemicals. No artificial ingredients. Nothing that could sit forgotten for a few years in the back of the pantry, and still look exactly the same as the day you picked it up for 2/$1.

So today, I bring you the recipe for light, spongy chocolate cupcakes with a fluffy marshmallow frosting that melts in your mouth. The cake is springy, moist and flavorful; the frosting is dense enough to be sinful but light enough that it doesn't overwhelm the cake.

Here is the recipe, and a picture of them topped with a single chocolate wafer:

and as an alternative, sprinkled with mini chocolate chips instead:

Chocolate cupcakes with marshmallow frosting
(this recipe makes 2 dozen with a few extra for placating your hungry family, who apparently cannot wait all of one day until the party)
2 cups all-purpose flour
1 teaspoon salt
1 teaspoon baking powder
2 teaspoons baking soda
3/4 cup unsweetened cocoa powder; I used Ghirardelli
2 cups white sugar
1 cup vegetable oil
1 cup hot coffee
1 cup buttermilk
2 large eggs
1 teaspoon vanilla

For marshmallow frosting:
1.5 cups butter 
3 cups confectioner's sugar
1 teaspoon vanilla extract
2 tubs of marshmallow fluff

Preheat your oven to 325 degrees Fahrenheit. Grease your muffin tins, or use liners.

In a large bowl, sift together the flour, salt, baking powder, baking soda, cocoa and sugar. 

Mix in oil, coffee, buttermilk, eggs and vanilla. Mix just until blended. Batter will be thin, and rise high, so fill cupcake tins halfway only. With this recipe, I would recommend filling and baking your pans ASAP - don't pre-make this batter and let it sit out on the counter.

Bake for 18-20 minutes, rotating pans halfway through if necessary, and just until cupcakes spring back when pressed with a finger. Cool in pans for 10 minutes, then remove from pans to cool completely.

At this stage, I usually vacuum seal the cakes and then freeze them in our chest freezer until the day of the event. I believe they are actually better after a freeze and thaw than they are fresh out of the oven... but that's just me. They do have to be fresh when you put them in the freezer though... no freezing is going to bring back stale cupcakes! If you do freeze them ahead of time, unwrap them completely and let them thaw before you decorate. It won't take long... never takes mine more than an hour.

To decorate these, I used a marshmallow buttercream frosting that tastes of marshmallow but is sturdy and pipeable like a buttercream. Simply whip together 1.5 cups (3 sticks) of butter, 3 cups of sifted confectioner's sugar, and 1 teaspoon of vanilla extract on medium-high speed. When it's fluffy, add in 2 tubs of marsmallow fluff and gently whip on low speed until completely blended together and no large air bubbles remain.


Thursday, January 2, 2014

Yellow and green - Korean side dishes

If you've ever had an authentic Korean meal, you know that any entree you order will be accompanied by a variety of side dishes, or "banchan." Having a tiny bit of this, and a bit of that... you're guaranteed a well-rounded meal. I love the way that the dark green and light yellow of these two dishes look together, so often will plate them side by side.

"Spinach" and soybean sprout side dishes (banchan)

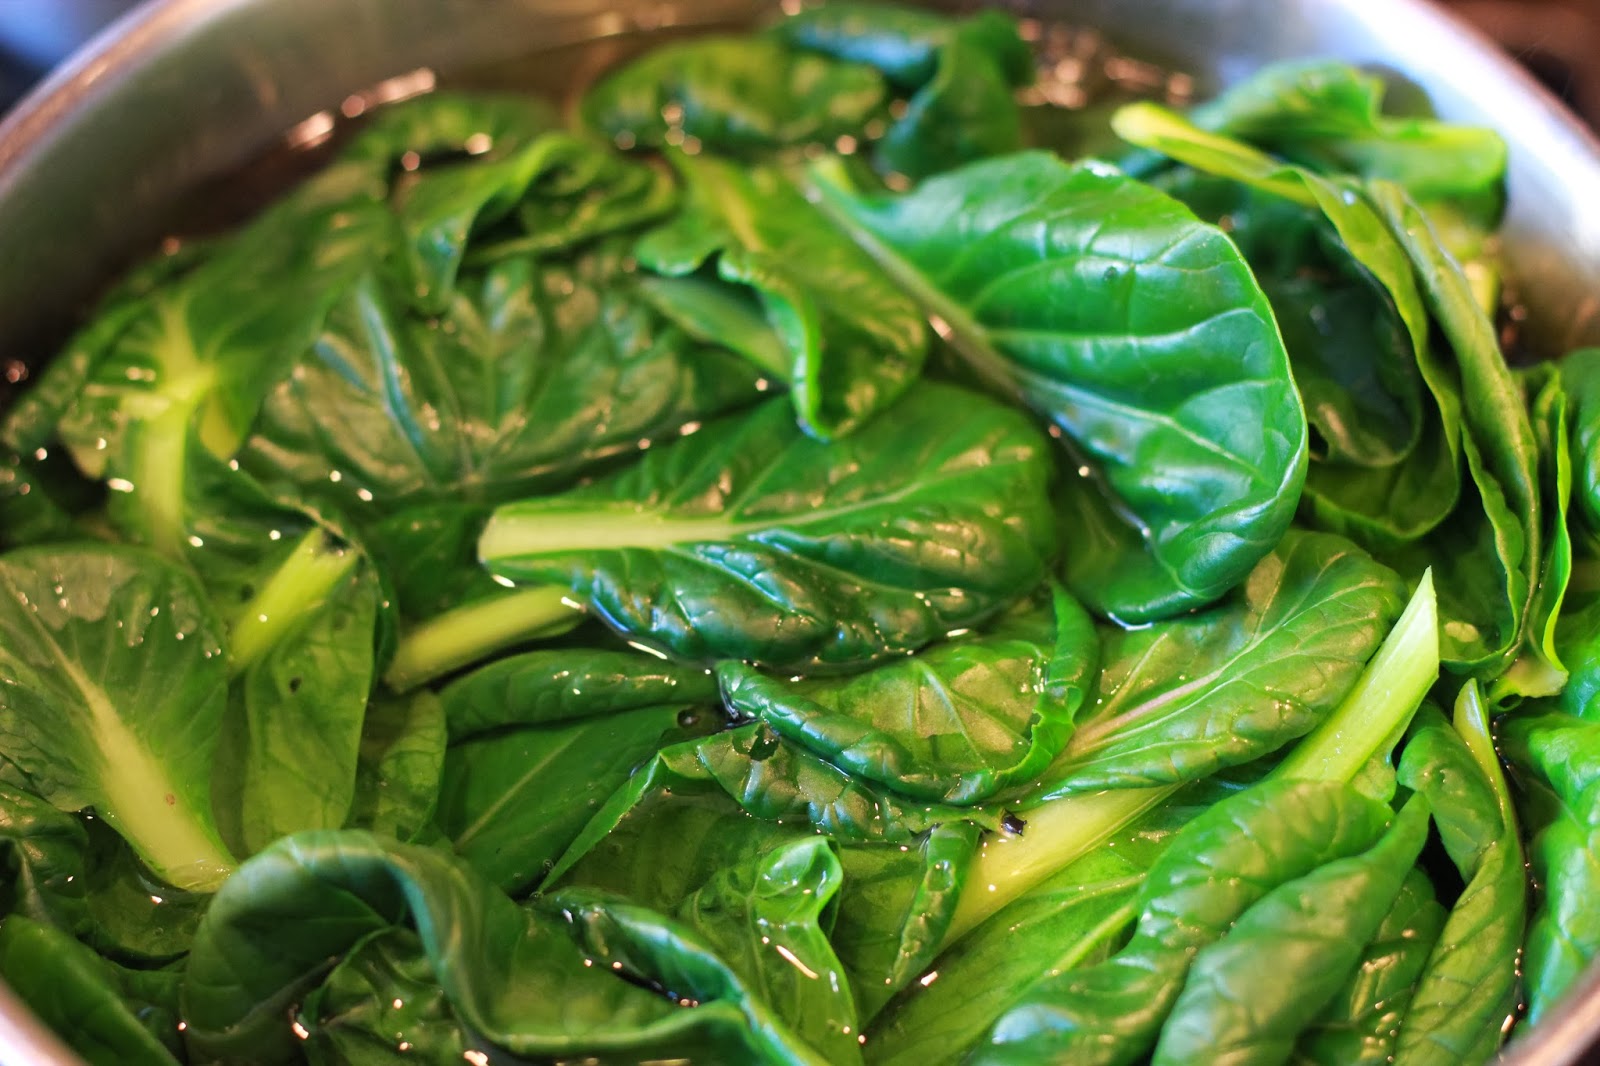
The "green" is typically made with spinach, but I had a messload of tatsoi (a type of mustard green) in the garden that needed to be cut and it worked out just fine. You could probably use swiss chard, collard greens, or just about anything in that family. I picked up organic soybean sprouts at the Korean market but you can also sprout your own.

First, wash your greens. You want them clean. :-)


Bring some salted water to a boil, and drop your greens in; spinach wilts very quickly, but tatsoi took just a minute or two longer... you want it all well-wilted but not completely disintegrated so keep a close eye. It shouldn't take long.


Then you drain the greens and squeeze out the water.

In the spirit of efficiency, I used the same salted boiling water to cook my "yellow" -- the soybean sprouts -- for about 5 minutes.You want them to no longer be crunchy but definitely not mushy.


I then drained the sprouts as well.

The same seasoning was used for both. Sorry this isn't very precise, but I totally took a pinch-of-this-and-dusting-of-that approach.
  • Splash of soy sauce
  • Just a few drops of sesame oil
  • Dusting of red pepper flakes
  • Salt and pepper to taste

 Two friends, made to be together!


Monday, December 16, 2013

TV and Korean dumplings (mandu)

I don't watch much TV. I might have, many years ago, but nowadays our Netflix queue is completely dominated by Jake and the Neverland Pirates, My Little Pony, Miffy, and Strawberry Shortcake. Once a week though, on Sunday nights, I will occasionally watch a few episodes of something or other... currently it's Fringe.

So last night, after the kids were down and the house was quiet, I watched three episodes back-to-back with the Irish Boxer Husband. But instead of being curled up on the couch under a blanket with a mug of tea, we made mandu. It's so much better knowing exactly what goes into them, making them with the ingredients we like, and it probably works out to be cheaper. And while we made almost 200, you certainly don't have to make that many at once... though good company certainly makes it go quickly and you can easily freeze them so you never run out.

Keep in mind, you can make mandu with almost anything. All vegetarian, different meat, seafood... feel free to customize.

Korean dumplings (mandu)
3 packs of dumpling/gyoza skins
2 pounds of ground beef
1 pack of firm tofu
6 cups of mung bean sprouts
2 cups of Korean chives (buchu)
2 carrots
4 cloves of garlic
1 egg
4 tablespoons of soy sauce
2 tablespoons of sesame oil
1 tablespoon vegetable oil
Salt and pepper

Chop the chives and combine with vegetable oil, mix well. I saw this tip on Maangchi's blog and she says it helps keep the vegetables moist.

Cook with sprouts in a little bit of water in a big saucepan until they are quite limp but not totally disintegrated. It took about 5 minutes for me. Then chop roughly.

Very finely chop the carrots. You don't want to bite into a big chunk of crunchy carrot when you eat your mandu! Do the same with the garlic.

In a big bowl, mix the ground beef, tofu (you crush it with your fingers as you mix), sprouts, chives, carrots, garlic, egg, soy sauce and sesame oil. Whew! Season with salt and pepper. If you're not sure if the seasoning is quite right, I cook a tiny bit of the filling in a frying pan to taste it.

It's mandu-making time! I used the rounds, but they come in squares, too... the process is basically the same. Set yourself up a little working area with your filling, skins, a little bowl of water, and a baking sheet lined with parchment paper. And of course, your episode :-)

Dip a finger into the water and use it to wet the edge of half the skin.

Then put in about a tablespoon's worth of filling. You'll learn how much you can fit after you've done a few, and it'll start to go much faster at that point.

Fold over the skin, and press firmly to seal tightly.

Then wet the outside edge and put in three pleats to really help hold the mandu together. Otherwise, they might break open while cooking and nobody wants that!

We put ours on baking sheets to freeze. After three episodes of Fringe, we had nearly 200 made.

The baking sheets went straight into the chest freezer and I'll bag them up once they're solid.

Some couples go bowling, or watch a movie, or take long moonlit walks on the beach. We make mandu!

Wednesday, December 4, 2013

Thanksgiving recipe rundown: grill-roasted turkey

And now... the turkey.

Let me preface by saying, I spent most of my life unsure I even liked turkey.

It either meant the overly processed slimy sliced stuff you were supposed to use for sandwiches, or the dry and tasteless stuff that came in stringy chunks.

And then, I had good turkey. And it completely changed my view.

Once I had turkey cooked on the grill, I knew there was no going back. It's an increasingly popular way of doing it, though the methods vary -- directly on the grate, cut into pieces, in a pan -- but this is the way I've done it the past few years. Maybe next year I'll try something new. But no matter what, I don't think my turkeys will ever see the inside of an oven.


Grill-roasted turkey
1 turkey -- preferably organic, pastured, free-range, non-processed, never frozen... you get the idea. This year, ours was a 13-pound Diestel Farms.
2 gallons of water
2 cups of kosher salt
1.5 cups of brown sugar
1 tablespoon peppercorns
1 head of garlic
6 sprigs of rosemary
6 carrots
1 bunch of celery
4 onions
2 lemons
1 stick of butter

The night before: You're going to brine the turkey. You can Google all the science behind why, so I'll just say -- it's worth it. Keep in mind that if you're using a non-organic turkey, it might already be injected with a brine solution, which is the only reason to skip this step.

Boil a few cups of the water with the salt, sugar, and peppercorns. You can add other flavorings as well, but I usually don't; I feel like it's a bit of a waste, as any spices you might use will most likely get diluted so I'd rather use them more directly. Once the salt and sugar have dissolved, combine with the rest of the water -- which should be cold -- and then submerge the whole turkey, sans gizzards and such.

There's different ways of doing this; with a smaller bird, I use my biggest pot, line it with a huge plastic bag (you can find brining bags at the store specifically for this purpose), put the turkey in, pour the brine in, tie up the brine bag and then put the whole pot into a trash bag just in case there are any leaks at all. With a bigger bird, you may want to use a cooler. If the whole contraption doesn't fit into the fridge, use ice to keep it all chilly cold and put it outside if that's the kind of climate you live in.

The day of:
After the turkey's been in the brine for 12-18 hours, remove the turkey and discard the brine. Double up two foil roasting pans and put the carrots, celery, 2 of the onions (quartered) and some of the rosemary into the pan and set the turkey on top. Slice off the top of the head of garlic and throw the whole thing in there too -- no, really. Pour a little wine or water in so the vegetables don't char and burn.

Slather the butter under the skin, over the skin, everywhere, all over the turkey. Set it into the pan on top of the vegetables. Now set it aside for an hour at room temperature.

Make 4 foil packets of wood chips. (This is simple. Soak your wood chips, then fold them into foil packets and poke a few holes in the tops of each packet. That's it.) If you've got a three-burner grill, turn all three on until the grill hits about 450 and then turn off the middle burner. That's where the turkey will go. The foil packets go on either side; put two down when the turkey goes in and then replace them once they stop smoking.

Start the turkey off at 450 for about 30 minutes, until the skin is getting quite brown and crisp, then turn the heat down to about 350 to finish. I like to have it positioned with the legs toward the back, since dark meat takes longer to cook and the back of the grill tends to get hotter than the front. Overall, mine never take very long... I think about 90 minutes total for a 13-14 pounder. If the skin starts to get too dark, just put some foil over it.

When the temperature hits 155 in the breast, pull it off the grill, cover with foil, and watch to make sure it gets to about 160 as it rests.

And... that's it!

Tuesday, December 3, 2013

Thanksgiving recipe rundown: smashed potatoes

You can't have Thanksgiving without potatoes. Maybe even two or three types. But it seems like mashed potatoes are a cornerstone Thanksgiving dish, and though you can doctor them up a bit with roasted garlic or chives or cheese, they're still just mashed potatoes.

This year, we tried something different. Smashed potatoes, in colors! No more bland white bowl on the table. Plus, you can do a lot more work before the day, making Thanksgiving just a wee bit simpler. Winner in my book! Next year, I think I'll experiment topping them with chives and a sharp and dry grated cheese.


Smashed potatoes
5 pounds of baby (3-4" size) potatoes, in different colors; mine were Yukon Golds, reds and blues
1/2 stick of butter
1/4 cup of olive oil
3 cloves of garlic, minced
Salt and pepper to taste

Day 1: Boil the potatoes in heavily salted water until tender when pierced with a fork. Drain. Cool and refrigerate.

Day 2: Gently smash each potato with the bottom of a glass until it cracks and splits but is still in (mostly) one piece. Transfer to a baking dish and repeat until all the potatoes are in a single layer (you may need more than one dish).

Melt the butter in a small bowl or pan, add the olive oil and garlic, and hold over gentle heat until the garlic has thoroughly scented the butter and oil. Then pour over the potatoes in the baking dish and salt and pepper to taste.

About an hour before dinnertime, you're ready to bake!

Bake at 450 degrees for about 20 minutes, until the potatoes are really sizzling, and then flip them and give them another 20 minutes. You should start to see the edges crisp up and turn golden brown.

Serve while still hot, topped with herbs, cheese, more salt and pepper, vinegar... the possibilities are endless!

Monday, December 2, 2013

Thanksgiving recipe rundown: cranberry-persimmon sauce

Thanksgiving is behind us, though there are still plenty of leftovers in the fridge, and I figured I'd share some of the lessons learned from the recipes I tried this year. Nothing was a total flop, but there are definitely things I'd do differently for a few, and then a few really stood out as ones to save and repeat as often as possible. Here's one, inspired by this 2005 Gourmet recipe.

Cranberry-persimmon sauce
1 bag of cranberries
1 cup of white sugar (or to taste. My cranberries seemed especially tart this year)
1 star anise
1/2 cup water
1 teaspoon of vanilla extract
3 ripe Fuyu persimmons
Sprinkle of cinnamon

Boil the cranberries, white sugar, star anise and vanilla extract together in the water. Stir occasionally.


Once the cranberries pop, the sauce is done; take it off the heat, remove the star anise, and let it cool. It'll gel as it cools.


While you're waiting, peel and dice up the Fuyu persimmons into very small cubes -- about 1/4" square. Don't worry too much about whether or not they're ripe; Fuyus can be sweet even when still very hard. Mine were on the softer side so I knew there were sweet without a doubt. Then fold them into the cooled sauce, and stir in just a touch of cinnamon.

It doesn't get much easier than that! But this sauce is so good, I was eating it by the spoonful. And I've never been much of a cranberry sauce lover. I may experiment with turning it into a jam that can be canned so we can enjoy it year-round.

Next up: smashed potatoes that will make you wonder why you'd ever bother with the mashed kind...


Sunday, November 17, 2013

A recipe for "healthy" cookies

Food fads come and go. From low-fat to low-sugar to low-carb, low-GI, gluten-free, raw, macro, ketosis...

I can't really be bothered to follow a prescribed diet. My personal stance has landed somewhere in the gray area between whole food, high-plant, healthy fat, and two-working-parents-two-kids-busy-family.

These cookies are based on "lactation cookie" recipes that you can find online, but there's nothing in them that induces lactation, herbally or otherwise. Rather, they just have certain ingredients that are natural but pack a powerful punch when it comes to certain vitamins and nutrients. (Did I mention I'm horrible at taking vitamins, too?) They're not low-fat or low-carb, but there is nothing artificial or highly processed in them -- so whether it's the Irish Boxer Husband grabbing one on his way out the door, the Monkey asking for one with breakfast, or me enjoying one with my morning coffee, I feel good about having a jar of them around.


High-Nutrition Oatmeal Chocolate Chip Cookies (makes 4 dozen)
1/2 cup butter (organic, unsalted if you can find it)
1/2 extra virgin coconut oil
2 cups firmly packed brown sugar
4 tablespoons warm water
4 tablespoons ground flaxseed
2 eggs
1 teaspoon vanilla
1 1/2 cups whole wheat flour
1/4 cup brewer's yeast
2 tablespoons wheat germ
2 teaspoons baking powder
1 teaspoon salt
3 cups whole rolled oats
1 cup chocolate chips
1 cup chopped walnuts

Mix together the water and flaxseed; set aside.
Soften the butter and coconut oil, then cream together with the brown sugar. Add in eggs, one at a time, beating well; then add in vanilla.

Sift together the flour, yeast, wheat germ, baking powder and salt. Add the butter/coconut oil blend and the soaked flaxseed, and mix well. Then stir in the oats, chocolate chips and walnuts.

Drop by spoonfuls onto parchment paper and bake for 12-15 minutes at 350 degrees, until lightly browned. Cool on a rack... if you can wait that long :-)

Wednesday, September 11, 2013

Hanging on to the last of the basil

Every summer I set out to grow a ton of basil. Coming-out-of-your-ears basil. Can't-keep-up basil. Why-on-earth-did-I-plant-so-much basil.

Some years, it does well. The best year was when I had 6 plants set in a homemade Earthbox on a very sunny patio. Between the constant moisture, abundant sunshine and just-right planetary alignment, that year had us in pesto for 24 months, give or take.

The next year, life factors intervened and the baking sun of a new home on a hilltop dessicated my plants before they ever had the chance to take off.

This year, good intentions but then being 9.999 months pregnant during the world's longest heatwave meant my basil plants were gloriously ready to be sheared back in June... but never got sheared back... and so my hopes for massive bushes of basil fizzled like my skin in the Escondido sun.

But I got some. SOME. And I won't tell you about how I kept cheating by planting more even though it was way too hot and I couldn't get myself out there to water them enough. But still, my love of basil persisted and I was determined to try and preserve it into the fall, winter... and maybe even spring?... until I could plant more basil, yet again.

So I hopped on the Internet and found a few articles about how basil can be preserved in the refrigerator almost indefinitely if stacked with salt and olive oil. And not only do you get perfectly preserved basil leaves that can be singly dropped into dishes all winter long, but you get beautifully basil-scented oil, too.

This isn't much of a recipe, and I certainly didn't come up with it, but the crux of it is simple.

Wash and dry your precious, precious basil. Gently. GENTLY. And it'll take more than you think to fill even a very small jar.


Then you just layer it in your jar with salt in between layers.


Top off with olive oil (it's going to take quite a lot) making sure to fill all the air bubbles, then tuck away in the fridge.

I have yet to see how well this turns out, but am hopeful we'll have basil flavor to take us through the (relatively) dreary days of winter.

Monday, September 9, 2013

End-of-summer kick in the pants

My daughter (now a five-year-old wise to the ways of the world) and I were commiserating yesterday about how, in the heat of summer, we long for winter... and yet in the dreariness of winter we pine for summer. How true it is.

I remember how anxiously I waited for the first of the season's tomatoes, watching the plants I packed into one of our terraces grow and bloom and yet those flavorful fruits seemingly never to appear.


 And then, bright green globes that were so reluctant to blush red.


And then finally! our first ripe tomato of the year, savored piece by piece. And yet I still waited for that dead-of-summer onslaught that meant I could really start making big batches of tomato sauce.

Well the onslaught came:


...and then went, and there are now 35 pounds of tomatoes patiently napping in our chest freezer, waiting for the day I muster up the courage and energy to pull them all out and can a dozen jars or so of pasta sauce (that will last us all of 3 months probably, but hey, we love our pasta). And as I looked out at the plants showing their age even as they continued to pump out more tomatoes, I longed to pull them all out -- ruthlessly yanking them out by the roots despite all they had given us -- so I could clean and replenish the beds and start afresh with the kales, lettuces, chards, greens, onions, garlics, leeks, beets, and other mellower crops of fall and winter.

Of course that leaves me with 10 pounds or so of the last stragglers. What to do with all those green tomatoes? I could wait for them to hopefully ripen on the counter, or I could make an amazing green salsa that has me wondering why I ever waited for those tomatoes to ripen at all! Maybe next year, we grow tomatoes just to pull green fruit?!?


Green tomato salsa (makes about 4 cups)
~5 pounds of green tomatoes, any kind
~2 pounds of ripe tomatoes, any kind
~6 jalapeno peppers, or more/less according to your taste (yes there is a theme here)
1 large onion, chopped
3 cloves of garlic
1 medium lime (though being sadly lime-less at the time, I used a lemon and it worked out just fine)
1 bunch of cilantro
Salt/pepper to taste

In a pot, dump the green tomatoes and jalapenos and barely cover with water. Simmer until soft, which shouldn't take long -- 5 minutes or so should do it. Drain the water... you don't need it anymore.

Throw in the onion, garlic, juice from the lime, and ripe tomatoes and blend away. I like to use my immersion blender... makes it so easy! Then roughly chop the cilantro leaves and throw those in too. Blend to your preferred consistency, then taste and add salt/pepper as you like. If you're feeling particularly spicy, you can try adding other seasonings too -- oregano, cumin, paprika, smoked paprika (ooooh!), chili pepper...

Chill. Taste again. Then try and have this last for a week in your fridge. I dare you.

Friday, November 4, 2011

From summer in a jar to winter in a pot

It is in the fifties outside, with rain pouring down quite hard at times.  Welcome to winter in Southern California.  It's actually cold enough to justify a log in the fireplace, and even though the central heating isn't yet on, we are definitely throwing an extra blanket on the beds.

I wanted something warm and hearty to serve for dinner, so did some pantry diving and put this together while getting some work done from home this afternoon.  It was exactly what the weather called for, and even the Monkey took big spoonfuls of it.

Bacon Barley Soup with Mushrooms (makes about 6 servings)
4 strips of bacon, or the rough equivalent of 4 strips in bacon ends (which I actually prefer)
1 cup of pearled barley
1/2 pound of carrots
1/2 large onion
6 stalks of celery
2 cups of sliced baby portabello mushrooms
1 quart of chicken stock
2 cups of water
Salt and pepper to taste

Roughly chop the bacon or bacon ends, and throw into a 6-quart pot (nothing screams hearty soups like my Le Creuset, so I used that) over medium heat.  Let it sizzle for a bit so the fat starts to render out.

In the meantime (it's all about efficiency here people!), chop the onions, carrots and celery.  Add to the pot and let it all cook down until it smells wonderful and looks beautiful.  You should see a bit of browning going on if you're doing it right.  Don't rush this step -- it adds so much to the flavor to let everything caramelize.

Add the chicken stock, water, and barley (rinse it first!) to the pot.  It should then take about 45 minutes of simmering for the barley to swell and cook through.  About 10 minutes before it's done, add the mushrooms to the pot.

Barley is not easily overcooked, so cook it until it's good and soft and chewy, and then add salt and pepper to taste.  If you let it stand, it'll thicken up a bit further.  A sprinkling of chopped flatleaf parley would be lovely on top, then serve!

Sunday, August 7, 2011

Crunchy pickled goodness

I had never had these before trying my hand at making them out of sheer curiosity, so started out with one jar and waited impatiently for the recommend 3-week-period to pass before cracking them open.  Instantly in love, I whipped up 4 more jars yesterday.  They take so little time, and are a great way to take advantage of summer's green bean bounty.  I wish I could say I used beans from our own garden, but alas our gardening efforts seem to result in either charitable contributions to the local wildlife or flat-out failure.  Maybe next year...

One note about the recipe: I like to trim all the beans to about the same size so they stand up neatly in the jars, which means I end up with a lot of smaller pieces which I then cook up for dinner, etc.   If you were to cut them all up into smaller pieces, you'd have less "waste" so wouldn't need to buy as much.  I've put two pounds as the amount in the recipe but there could be some pretty significant variance depending on your preferences.


Pickled green beans (makes 4 pints)
2 pounds green beans, washed and trimmed
2 cups white vinegar
2 cups water
1/2 cup kosher salt
Spices - I use mustard seed, dill seed, peppercorns, and sometimes a garlic clove in each jar
4 wide-mouth pint-sized jars with 2-piece lids

Make sure your jars are clean and sanitized, and lids are in very hot water to soften.  Pour spices into the bottoms.  In a saucepan, combine vinegar, water and salt and bring to a boil.  In the meantime, trim the green beans to fit the jars, or just cut them into desired lengths and pack into the jars.  Personally I'm a little OCD and like them all the exact same length, standing up like little soldiers.


When the brine is boiling, pour over the green beans to within 1/4 inch of the jar tops.  Release any air bubbles and add more brine as needed to maintain a 1/4 inch headspace.  Screw on the lids and process in a boiling water bath for 5 minutes.  Then try your best not to dig into them for at least three weeks!

Daily bread

I first started baking bread on a regular basis after Monkey was born. I guess I really sort of painted myself into a corner because after having homemade bread for a few weeks, I found it truly impossible to go back to store-bought "bread" -- and didn't want to pay for so-called artisan bread that I could make at home.  So, I'm now on the hook to produce two loaves every other weekend to supply us with bread for toast and the occasional sandwich.

This is my standard recipe, to which I might make small tweaks but never truly deviate. When Rachel will eat nothing but bread for a whole day, the fact that I know what exactly goes into that bread (and that it's relatively wholesome) makes me feel better.

I make this in my trusty Kitchenaid, but the recipe can be made completely by hand if you're so inclined (it's a great upper body workout).


Everyday Bread (makes 2 loaves)
2 cups whole wheat flour
3-4 cups bread flour
1 cup flaxseed, ground
1 cup quick-cooking oats
2 cups boiling water
1 cup whole milk (sour if you like)
2 packets instant dry yeast (approx. 4 1/2 tsp)
1/4 cup vital wheat gluten (optional - but it helps with the bread texture and rise)
1/3 cup honey
1 tbs butter
3 tsp kosher salt
1 tbs vegetable oil
Optional add-ins: 1 cup raw sunflower seeds,  ground sprouted wheat berries, or other nuts/seeds

Put honey, oats, and butter into the Kitchenaid mixing bowl. Pour 2 cups of boiling water over, and allow to sit for 10 minutes until oats are soft, butter is melted and honey is dissolved.  Add milk, whole wheat flour and yeast (make sure not to add yeast until you've added in the milk and flour); stir until dissolved and allow to sit for an additional 10 minutes until bubbly and foamy.  Add vital wheat gluten and 2 cups of bread flour with dough hook on lowest speed; add salt, ground flaxseed and the rest of the bread flour 1/4 cup at a time until a nice dough pulls together.  This stage should not take longer than 10 minutes or you risk overkneading your dough.  If you're using additional mix-ins, add them in last, just as the dough starts to come together.

Once the dough is smooth, elastic, and cohesive but not overly sticky, it's all standard process -- add the oil and roll the dough in it (I do this in the same bowl - one less thing to wash!); allow to rise until doubled; punch down, shape into loaves, allow to rise again; and bake at 350 for approx. 50 minutes (time will vary slightly depending on your loaf pans).  Once the bread is out of the oven and cooling, you can brush the top with some melted butter if you like.

Then let the warm-and-fuzzies wash over you as your finicky three year old demands a "BIG PIECE OF BREAD" and practically inhales it on a day she has turned her nose up at everything else you've offered.

Saturday, July 30, 2011

The jam-making machine is back online!

...with some assistance from the IBH, of course.

Picked up 8 packs of beautiful blackberries, and a lapful of black velvet apricots on the last trip to the farmer's market. Decided they might blend together nicely, and be complemented with a touch of warm spice... time to experiment!

The blackberries...

Popped one in my mouth and decided I did NOT like blackberry seeds, so just about killed myself separating the juice and pulp from the skins and seeds. I'm sure there is an easy way to do this, but could not think of one for the life of me, so basically forced them through a sieve with a spoon. Pretty darn primitive.


Some lovely puree of black velvet apricots...


Swirl them together in my treasured Le Creuset pot...


Add lemon juice for acidity and the calcium water that is Part I of the Pomona's Pectin process. Bring to a boil, stir in sugar with Part II of Pomona's Pectin, taste, add more sugar as needed, add cinnamon and nutmeg to taste, test for gelling, pour into hot sanitized jars, process in boiling water, seal... then leave the jars on your counter so you can caress them lovingly each time you pass by (and make all the people who visit your home jealous).

Cannot wait to start cracking into these.